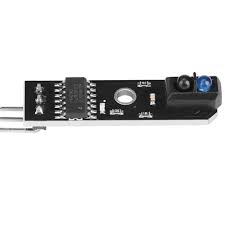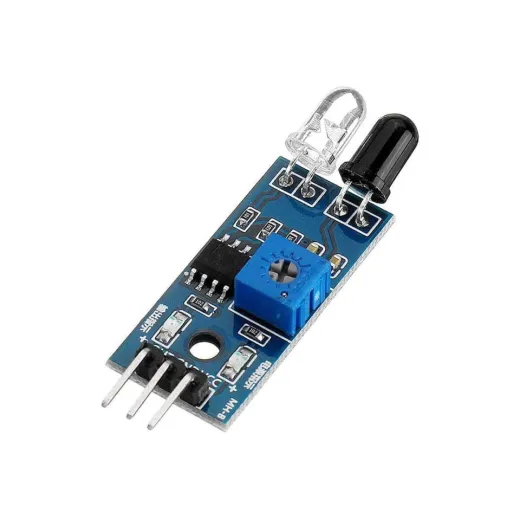
Infrared Obstacle Avoidance Tracking Sensor Module
Infrared Obstacle Avoidance Tracking Sensor Module
RWF 2,500.00
An infrared obstacle avoidance sensor is designed to detect an obstacle or the difference in reflective services. Some application is to help a wheeled robot avoid obstacles with a sensor to react to adjustable a distance setting.
Specifications
- Working voltage: DC 3.3V-5V
- Working current: 20mA
- Operating Temperature:-100C-+500C
- Detection distance: 2-40Cm
- IO interface: 4 wires interface (-/+/S/EN)
- Output signal: TTL level (low level there is an obstacle, no obstacle high)
- Adjustment: adjust multi-turn resistance
- Effective angle:350
- Size: 28mm*23mm
- Weight Size: 9g
Application
- It can be used in automatic photoelectric reflex application
- The smart car obstacle avoidance
- The intelligent car or robotic line walked along the black line path
- The intelligent car cliff avoidance
How its work
IR Sensor Pinout
The IR sensor has a 3-pin connector that interfaces it to the outside world. The connections are as follows:

VCC is the power supply pin for the IR sensor which we connect to the 5V pin on the Arduino.
OUT pin is a 5V TTL logic output. LOW indicates no motion is detected; HIGH means motion is detected.
GND Should be connected to the ground of the Arduino.
How Does an IR Motion Sensor Module Work?
The working of the IR sensor module is very simple, it consists of two main components: the first is the IR transmitter section and the second is the IR receiver section. In the transmitter section, IR led is used and in the receiver section, a photodiode is used to receive infrared signal and after some signal processing and conditioning, you will get the output.

An IR proximity sensor works by applying a voltage to the onboard Infrared Light Emitting Diode which in turn emits infrared light. This light propagates through the air and hits an object, after that the light gets reflected in the photodiode sensor. If the object is close, the reflected light will be stronger, if the object is far away, the reflected light will be weaker. If you look closely toward the module. When the sensor becomes active it sends a corresponding Low signal through the output pin that can be sensed by an Arduino or any kind of microcontroller to execute a particular task. The one cool thing about this module is that it has two onboard LEDs built-in, one of which lights on when power is available and another one turns on when the circuit gets triggered.
IR Motion Sensor Module – Parts
For most of the Arduino projects, this sensor is used to detect proximity or to build obstacle avoidance robots. This Sensor is popular among beginners as these are low power, low cost, rugged, and feature a wide sensing range that can be trimmed down to adjust the sensitivity.

This sensor has three pins two of which are power pins leveled VCC and GND and the other one is the sense/data pin which is shown in the diagram above. It has an onboard power LED and a signal LED the power LED turns on when power is applied to the board the signal LED turns on when the circuit is triggered. This board also has a comparator Op-amp that is responsible for converting the incoming analog signal from the photodiode to a digital signal. We also have a sensitivity adjustment potentiometer; with that, we can adjust the sensitivity of the device. Last and finally, we have the photodiode and the IR emitting LED pair which all together make the total IR Proximity Sensor Module.
Commonly Asked Questions about IR Sensor
Circuit Diagram for IR Motion Sensor Module
The schematic diagram of the IR Motion sensor is shown below. The schematic itself is very simple and needs a handful of generic components to build. If you don't have a prebuilt module on hand but still want to test your project, the schematic below will come in handy.
In the schematic, we have an IR LED as Transmitter and the Photodiode as a Receiver. If an object is in front of the sensor, the reflected light from the object is received by the photodiode, and depending upon the intensity we can determine how far or how close the object is. In the schematic, you can also find an LM358 Op-Amp which is doing all the comparison work and generating the output. Other than that, there is a potentiometer that can be used to adjust the sensitivity of the IR Sensor module or the triggering distance for this module.
IR Sensor with Arduino UNO – Connection Diagram
Now that we have a complete understanding of how an IR sensor works, we can connect all the required wires to Arduino as shown below.

Connecting the IR sensor to any microcontroller is really simple. As we know this sensor outputs a digital signal and processing this signal is very easy. There exist two methods to do so first, you can always check the port in an infinite loop to see when the port changes its state from high to low, or the other way is to do it with an interrupt if you are making a complicated project the interrupt method is recommended. Power the IR with 5V or 3.3V and connect ground to ground. Then connect the output to a digital pin D9. We have just used a Male to Female Jumper wire to connect the IR sensor module with Arduino board as shown below.

With that, you’re now ready to upload some code and get the IR Motion Sensor working. You can also check out the above module in action at the bottom of this article.
Arduino Code for Interfacing IR Motion Sensor Module with Arduino
The Arduino IR sensor module code is very simple and easy to understand. We are just basically keeping track of whether the input to pin D9 is HIGH or LOW.
We initialize our code by declaring two global variables, the first one holds the pin value where the IR sensor is connected and the second one holds the value where the LED is connected
int IRSensor = 9; // connect IR sensor module to Arduino pin D9
int LED = 13; // connect LED to Arduino pin 13
Next, we have our setup function. In the setup function, we initialize the serial with 115200 baud. Next, we print a statement to check if the serial monitor window is properly working or not, and then we initialize the IRSensor pin as input and the LED pin as output.
void setup(){
  Serial.begin(115200); // Init Serial at 115200 Baud Rate.
  Serial.println("Serial Working"); // Test to check if serial is working or not
  pinMode(IRSensor, INPUT); // IR Sensor pin INPUT
  pinMode(LED, OUTPUT); // LED Pin Output
}
Next, we have our infinite loop. In the infinite loop, we first read the sensor pin with the digitalRead() function and store the value to sensorStatus variable. Then we check to see if the output of the sensor is high or low, if the output of the sensor is high that means no motion is detected, else motion is detected, we also print this status in the serial monitor window.
void loop(){
  int sensorStatus = digitalRead(IRSensor); // Set the GPIO as Input
  if (sensorStatus == 1) // Check if the pin high or not
  {
    // if the pin is high turn off the onboard Led
    digitalWrite(LED, LOW); // LED LOW
    Serial.println("Motion Detected!"); // print Motion Detected! on the serial monitor window
  }
  else  {
    //else turn on the onboard LED
    digitalWrite(LED, HIGH); // LED High
    Serial.println("Motion Ended!"); // print Motion Ended! on the serial monitor window
  }
}
That is the end of our simple Arduino based IR sensor code.
Working of the IR Motion Sensor Module
The GIF shows the IR sensor module in action, you can notice the LED turn on both on the module and on the Arduino board as pointed buy the red arrows. If you are working with an IR Motion Sensor Module for the first time then you should get a response similar to this.

Frw 2,500







.jpeg)
